")
")
- Import file of categories
- Import file of items
- Import file of images
Go to Joomla admin panel->'Components'->'IPrice minimart'->'Import CSV' for importing items .
You should use CSV file to import items. The first line of the import file may contain field descriptions. The second line of the import file contains the system names of the field. You need to set the import parameter "File has field headers" to "Yes" to miss the import first line describing the fields. You can skip the first line with field descriptions, but use only the line of field system names. In this case You do not need to set the parameter "File has field headers". You should use UTF-8 encoding for import files.
Import categories
The categories import file is designed to add and update categories, as well as to move subcategories between categories. The order of the fields in the import file can be any. Optional fields may be missing in the import file if they are not necessary.
The list of valid system field names in the category import file:- parent_path - mandatory field. The path of the parent category. The path must consist of aliases of the parent categories, separated by the symbol '/'. This path sets the parent category for the current category. For exmaple: 'phones/smartphones' means that the current category has the parent categegory 'smartphones' (and the category 'smartphones' has the parent category 'phones'). If the category is root and has no parent, then this field must be empty.
- parent_name_path - optional field for inormation purpose only. This field can be excluded form the import file. This field is a path of parent category names for a more understandable representation of the parent category. Eg 'Phones / Smartphones'
- alias - mandatory field. The category Alias is a category identifier that participates in creating a URL link to the category. Each category must have a unique alias within the parent category. Alias participates in the formation of the url category, so the alias should consist only of Latin characters (the dash "-" is allowed). For example: a category with the name "Smartphones" can have an alias of "smartphones" and have a parent category with an alias of "phones". In this case, the category URL will look like this: www.mysite.com/catalog/phones/smartphones.
- name - mandatory field. Category name.
- forcart - If 1 (yes), then this category contains shipping items and extra cost items of the order. If 0 (No), this this category contains normal items (prpducts).
- image - Category image field field must contain a relative route to the category image file. For example: images/com_ipricecalc/upload/category_netbooks.jpg
- pagetitle - Title for category page.
- mainproptitle - The title for the main property of products in this category..
- inputfields - Properties (custom fields) used by items of this category. You must set the system field names, separated by the symbol ';'.
- customfields - Characteristics (custom fields) used by items of this category. You must set the system field names, separated by the symbol ';'.
- pricefields - Fields allowed for display in the price list for items of this category. You must set the system field names, separated by the symbol ';'.
- formulaprice - Formula price for items of this category.
- formulaweight - Formula weight for items of this category.
- published -Published state (0-unpublished; 1-published). Published by default.
- discount - Discount name for items of this category.
- exclgdisc - Exclude items of this category from the calculation of the total discount on the order (0-no, 1-yes).
- salestax - TAX for items of this category (%).
- ismultiple - Is the category a multiple item? 0-no; 1-yes. See more about the category as a multiple product..
- dropdown - main property for the multiple item.
- totalcost - price for the multiple item.
- description - category description.
Import items
The file of import items is designed to add and update items, as well as to move items between categories. The order of the fields in the item import file can be any. Optional fields may be missing in the import file if they are not necessary. The list of valid system fields in the item import file:
- category_path - base category path. mandatory field if adding item. The path of the basic category, consisting of aliases of the parent categories, separated by the symbol '/'. For example: 'phones/smartphones'. The basic category will determine the properties and characteristics of the item, if used. Also, the item will inherit a discount from the base category, if specified.
- itemcategory_paths - paths of the item categories separated by comma. For example: 'phones/smartphones,phones/gsmphones'
- sku - item SKU;
- alias - Alias of the item. Item alias will be automatically generated from the "SKU" field, if it is not specified in the import file. The alias must contain Latin characters and '-' (dash). Do not use spaces or special characters in the "Alias". Alias will participate in the creation of SEO link to the item;
- cost - price of the item;
- curr - currency code of the item (USD, RUR and etc). If the currency code not specified in the import file, the currency code for the item will be the same as basic currency in parameters component;
- name - item name;
- weight - item weigth;
- description - item short description;
- showcount - type of item select: 0 - checkbox; 1 - input box of quantity; 2 - radio button (value 2 is valid for shipping items only!);
- radiogroup - the ID of radio button group. Should be equal for all radio buttons from the same group. Should be unique for each radio button group. This parameter is needed for items with 'showcount' = 2 only;
- defqty - quantity of item selected by default. This quantity will be selected by default when item is displayed;
- discount - predefined discount name for item. You need to define discount first using discount manager;
- exclgdisc - exclude item from global discount for the order (0-no, 1-yes).
- salestax - tax rate (%);
- enable_file - allow user to attach file on the item line of checkout page (1-yes; 0-no);
- unit - item unit name.
- avail - available quantity in stock;
- dropdown - main propety of the item (dropdown list). Use this property to set additional cost for item options. Format: option-name-1:add-price-1:avail-1:default#option-name-2:add-price-2:avail-2:#option-name-3:add-price-3:avail-3:...
Where option-name - is the name of the option; add-price - aditional price for the option; avail - number of available items with this option; default - specify to select this option by default; # - options delimiter. For example: red:10:1000:default#blue:15:800:#green:20:850:
If you do not need to specify add-price and/or avail, then you need to use empty delimiter ':' without values. For example: red:::default#blue:::#green::: - fulldescription - full description of the item;
- destfilename - file name for automatic delivery of item. The file name is specified without a route, for example "item.zip". Auto-delivery files must be uploaded to the site folder /administrator/components/com_ipricecalc/files/.
- destcode - text of automatic delivery of goods. This text may contain a purchase key, code, and so on. It sent automatically to the customer’s e-mail along with the file for automatic delivery.
- featured_items - related items for this item (list of SKU separated by comma);
- meta_description - SEO description of the item for metatag META_DESCRIPTION.
- keywords - SEO keywords of the item for metatag META_KEYWORDS.
- classname - name of the control class for the shipping items and extra cost items for the order. For example "bonus".
- capacity - item capacity.
- featured - recomended item? 0 - no, 1 - yes.
- published - published item? 0 - no, 1 - yes.
- qtyenabled - Enable editing of item quantity for the user? 0 — no, 1 - yes, -1 - by default (used the global component parameter).
- stepqty - step of change of the item quantity by arrows.
- minqty - the minimum value of the item quantity.
- maxqty - the maximum value of the item quantity.
- qtylistvalues - List of values for the item quantity (eg. 1;2;5;10). If specified, the user will be able to select the quantity of the item only from this list.
- created - date of adding item. Format: 'YYYY-MM-DD', for example: '2019-03-28'. Current date by default if this field is empty or missing.
The first line of the import file should contain the system field names. Can specify a descriptive name for the fields in the first row of import file for clarity. In this case, system field names must be listed on the second line of the import file and You need to set the import parameter "File has field headers" to "Yes" to miss the import first line describing the fields.
Encoding of CSV import file
You should use UTF-8 encoding for CSV import file. The best way to save CSV file with UTF-8 encoding is to use Notepad++ editor or Open office application.Delimiters
You should use parameters "Column delimiter", "Text delimiter", "Line delimiter" if you use non-standard delimiters in your CSV file. Standard values by default of this parameters:- Column delimiter - ; (semicolon)
- Text delimiter (character, framing the field value) - " (double quote)
- Line delimiter - \n (line feed)
Adding new items
Fields 'category_path', 'sku', 'name', 'cost' are required when adding items. Field 'SKU' must be unique for each item. Item will be added to the category with path 'category_path'.Updating of existing items
Field 'sku' is required when updating items. You can use any sytem field names to update data of item. This is the example of CSV import file for updating prices. To move item to another category just change 'category_path' field to the category path of the new category.Importing custom fields.
You should include system field name of the custom field of the item to header line of CSV file to import custom field. For example, you can include field name 'manufacturer' of predefined custom field 'Manufacturer' to import file to set manufacturer of the item.Data formats of import fields
Price and quantity specified in the form of number with decimal separator "dot", for example: 10243.52Import Scheduled
The system allows you to configure automatic importing from a CSV file on a schedule. It's enough to copy a import CSV file to the site folder /administrator/components/com_ipricecalc/import (the file extension must be .csv). Then you need to configure the automatic import in global component parameters in the "Auto Import" section: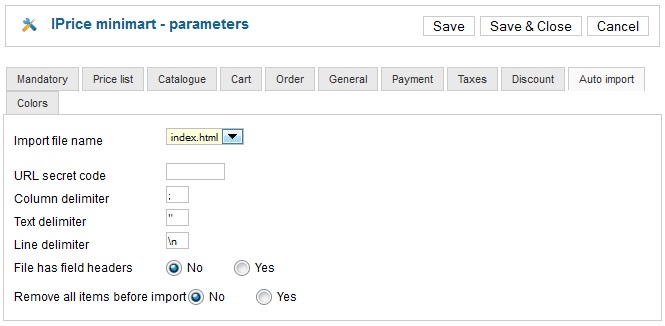 IPrice minimart auto import parameters
Pic 1. Global parameters, 'Auto import' section.
- Import file name - select CSV import file.
- Change Column delimiter, Text delimiter and Line delimiter if needed.
- Remove all items before import - if 'Yes'. then all items will be removed before import. This is necessary if you plan to completely update the list of products from the import file each time. Nevertheless, it is recommended not to delete all items before importing, but to make unpublished of unnecessary items using the "published" field: add a column with the field "published" to the import file. Specify 0 for all the items that need to be disabled, and specify 1 for items that you want to display in the "Published" column.
Add the cron scheduled task on your server using hosting control panel. Use this URL : http://www.yoursite.com/index.php?option=com_ipricecalc&task=autoimport&sc=secretcode to start import procedure by Cron sсheduled task. In URL: www.yoursite.com - URL of your site; secretcode - the secret password you have invented, set in the "Secret password" component parameter on the "Mandatory" tab. Copy updated import csv file to site folder /administrator/components/com_ipricecalc/import each time you need to update items.
Loading a large amount of items
When loading a large number of items (more than 3000-5000) will likely need to increase the limit on the execution time in php.ini. Set max_execution_time is set to 180 (3 minutes). May require a larger value. Find the value empirically. If your hosting is not possible to set this via php.ini, you can do this with the file .htaccess, by writing the following command: php_value max_execution_time 180. You can also split a large file into several parts imports. For example, each category of items - in a separate file.Import of images
Use the sample file to import images to create your own import file. It is recommend to download sample images before import of sample file. Unzip and copy images to image folder of the component /images/com_ipricecalc/upload/.
The order and number of fields in the import file of images must be fixed as opposed to the import file of the items.
The list and the order of the fields in the import file images:
- Type - Image type: 'item' - for the item image, 'category' - for the category image;
- SKU - SKU of the item for the type 'item'; category name for the type 'category';
- File name - file name of image (for example: image1.jpg). You need to upload images to the site folder /images/com_ipricecalc/upload/ before importing;
- Image name - name of image (use for ALT of IMG tag);
- Main image - Main image flag. One of the product images to be marked as the main one with the flag '1'. If a single image of the product, it must be marked as main by flag '1'. If the product has different properties of different images, one image for the product of the same property must be marked as main by flag '1'.
- Property - if the product has options, and each option should have a set of images, in this field you can specify the name of the option for which the image is loaded.
- Description - description of the image (use for TITLE of IMG tag);
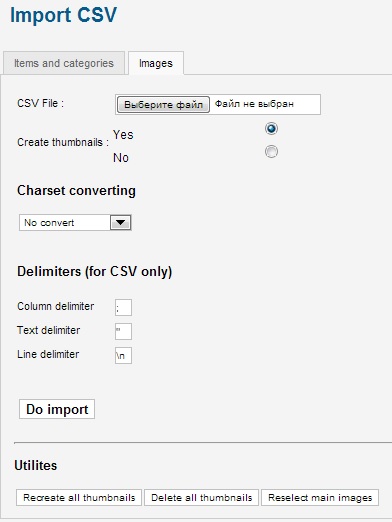
To import images, go to the admin panel component to the "Import CSV" and select the "Images" tab.
Options:
- CSV file - select import file;
- Create thumbnails - create or not thumbnails for images. if 'yes', for each image will be automatically created 3 thumbnails: large - to zoom in, medium - for the main product images in catalog mode, small - for the image in the image gallery of the product or product image in the price list. Thumbnail size you can set the component settings in the "Images" section.
You should use parameters "Column delimiter", "Text delimiter", "Line delimiter" if you use non-standard delimiters in your CSV file.